Hello again loves! As promised, I am getting my nail tutorial up today! I apologize its a day late. I had a few complications with the nail polishes I used... will explain as I do the tutorial! lol
I put up on my FaceBook page asking people to give me some requests of nail designs. I absolutely LOVE the challenge plus I love putting stuff up that I know you want to see! So as requested by one of my good friends, Larissa, I have put together a bright star design. She wanted green and pink but sadly I couldn't find that right green to go with the pinks that I had. =( I ended up doing orange with pink for the summer time! =)
So hope you enjoy! Thank you again for the request Larissa! Keep them coming everyone!! =)
Keep reading for the step by step tutorial to do the nails below!!! ENJOY!
Products I used:
As my primer/base coat... I just used my favorite nail hardener by Sally Hansen! I HAVE to use a product like this or I'll end up breaking my nails quickly.
As the base color, I chose AVON nail enamel in Viva Pink. First I have to say I love Avon nail polishes and the colors are beautiful and affordable, but the dry time on this nail polish even with thin layers was AWFUL!!!! I'll stick to their speed dry nail polishes.
For the sparkles on the pink, I used KleanColor Nail Lacquer in Fuschia Glitter.. I didn't use the larger pieces of glitter in this polish, just the rainbow sparkles.
For the detailing I used:
As the base stripe, I used Sally Hansen Xtreme wear in Sun Kissed. I'm a huge fan of these polishes and have almost all the Xtreme wear colors! haha
For just added detailing and cleaning up the Sun Kissed stripe, I used a blue based pink by Nabi Nail Art Lacquer in Bright Pink. I'd never heard of this brand of nail art striping polishes but I LOVE THEM! I want more! haha
For the stars.. I didn't have any star glitters so I just used the star glitters in this polish by KleanColor Nail Lacquer called Silver Star!
So to start as always, ALWAYS treat your nails with a base coat or like I did, use a hardener to protect your nails. I personally did two coats of hardener to make sure my nails were protected from staining and to help keep my nails from breaking since I'm still growing my pinky nail out after it broke! haha
Base color time! I did two thin coats of Viva Pink. This took forever to dry and it was very streaky. A good dupe by Avon would be Strawberry of their speed dry collection. Its a little darker but dry time would have been much better!!
Instead of doing a french tip, I did the same technique but diagonal across the nail with the sun kissed color. If the line isn't straight or perfect, no worries! I used my pin striping along the edge of the lines to clean it up.
Remember, you don't have to be perfect or whatever! Nail polish can be messy! You can always clean up the edges when you are done! When I first started doing french tips, I'd start on my skin and then rotate my nail to get the perfect line! haha Its okay to make mistakes.
=)
You can see on my middle finger, I have polish on my skin too! haha People ask me how I get the perfect nails.. its because I started out messy and cleaned them up! ;-)
Now to start the glitter!! I decided to do the glitter before doing the pin stripes on the edge of the orange color. For this, literally just add as much glitter to the pink part of the nail.
You could always have just regular glitter and clear nail polish. I wish I'd had done that. For that option, just add clear nail polish where you want the glitter to stick then sprinkle the glitter over those spots.. Let it dry, then wipe away the extra glitter on the nail! =)
Now add the Fuschia Pink pin striping polish on the edges of the orange color. This will clear up the lines plus you can see it better than my camera picks up. On your nails, it shows up as a highlighter pink color with a slight blue tone.
After I did that, I added the stars from the polish. This again would have been easier with just nail glitters and clear nail polish but since I didn't have any star glitters, I did it the hard way. I used a paper plate to put the polish on, got a star on the end of the brush, then placed it. Took a bit of time, but I like the result!
Well I hope you enjoyed this tutorial!! I know I'll be wearing these nails for at least a week or so! =) I will be posting a great trick after this post about how to take off thick hard to remove nail polish! I will have reviews of BFTE *Beauty from The Earth* Cosmetics this week as well! Thanks again for all the support! <3
Remember until Next Time, ALWAYS STAY SMILING!
XOXOXO,
LB
Hello everyone! My name is Sarah (also go by LB) and I've finally decided to start a beauty blog!! I've watched makeup guru's on YouTube for 2 years now and finally decided I wanted to be one too! In this blog I'll be doing better swatches of makeup, more detailed reviews when requested, nail tutorials, haul posts, and so much more!! I'm so excited to take this journey with you all and thank you all for viewing my blog and giving your feedback! =)
Tuesday, March 22, 2011
Saturday, March 19, 2011
&*(Just a Quick Update)*&
Hello loves! I apologize that I haven't posted recently. I'm currently in the process of starting to pack my house, waiting on orders to come in to review, and getting ready for my father in law to visit! I'm super excited he's getting to come visit and see us here in New Mexico before we move. I promise I will have new posts here soon.
Some things to look forward too:
BFTE (Beauty From The Earth) Cosmetics Swatches/Reviews
Nail designs such as pink and green stars, red carpet ready nails, pin strip nails, and more!
Avon reviews since I used to sell Avon ( I HAVE LOTS TO REVIEW )
And more!!
Please stick with me, I promise new stuff is coming!! Just been really busy lately and enjoying the cupcake nails I did! haha Will be changing them out this week as well as posting another nail tutorial!!
Thank you again to everyone who has shared my link, supported me, and listen to my insanely girly rambles about makeup and nail art! haha I appreciate every view and all the support. Even the critism is great so I know how better to reach out too all my fans of my page! Thank you all! I will be trying to change up my site this week as well so like I said stick with me! I promise I'll get it all set up this week!!
Until then, remember always stay smiling!
And always do what you love, be passionate, be creative.. JUST BE YOU! =)
XOXOXO,
LB
Some things to look forward too:
BFTE (Beauty From The Earth) Cosmetics Swatches/Reviews
Nail designs such as pink and green stars, red carpet ready nails, pin strip nails, and more!
Avon reviews since I used to sell Avon ( I HAVE LOTS TO REVIEW )
And more!!
Please stick with me, I promise new stuff is coming!! Just been really busy lately and enjoying the cupcake nails I did! haha Will be changing them out this week as well as posting another nail tutorial!!
Thank you again to everyone who has shared my link, supported me, and listen to my insanely girly rambles about makeup and nail art! haha I appreciate every view and all the support. Even the critism is great so I know how better to reach out too all my fans of my page! Thank you all! I will be trying to change up my site this week as well so like I said stick with me! I promise I'll get it all set up this week!!
Until then, remember always stay smiling!
And always do what you love, be passionate, be creative.. JUST BE YOU! =)
XOXOXO,
LB
Friday, March 4, 2011
&*(Nail Tutorial -- Sweet Strawberry)*&
Hello loves! =) I'm back again early in the morning with my newest nail design. My husband is stuck working crazy hours so I stayed up late and decided to do new nails and since you have all been patient with me, I decided to put it before I go to bed even though its 4:30 in the morning haha!
So this is my newest design! Read ahead for a step by step tutorial and the products I used!
Sorry the lighting was bad.. I have a better pic of my whole hand at the end! =)
So here we go!!
*Instead of taking pictures of each bottle, I took two pictures of the products I used and will list and say where I used them! =)
Left to Right
Sally Hansen Hard as Nails Hardener
Sinful Colors Professionals Base Coat
AVON Speed Dry Nail Enamel in Strawberry
Pure Ice in Watermelon Ice
Left to Right
Sally Hansen Hard as Nails Xtreme Wear in Going Green
Sally Hansen Hard as Nails Xtreme Wear in White On
Sinful Colors Professional in Green Ocean
Sinful Colors Professional in Pinky Glitter

Since I broke my pinky nail, I decided to start with Sally Hansen Hard as Nails Hardener to help keep my nails strong. It never hurts also with using bold colors to make sure you have a good base coat to keep your nails from having stains.
So on the safe side since I've dyed my nails before without a base haha, I added two coats of Sinful Colors Professional Base Coat... I am a fan of their nail polish so when I was shopping for the perfect green today for the leaf part of the strawberry nails, I picked up this base coat. I may do a review on it later on. =)

Now to start the strawberry nails! =) I love Avon products so when looking for the perfect shade for the strawberry, I found AVON Speed Dry Nail Enamel in Strawberry! I love tons of AVON nail polish so I was glad to get to use this one. It does dry quick which was also a plus!

Now if you know me, I LOVE sparkle so I decided to add an extra step and coat the entire nail with Pure Ice in Watermelon Ice. You don't have to add as much sparkle as I did of course, but I like the added effect.
Now to add the leaf part of the strawberry. Okay, this may seem hard but once you get started, it gets easier, I promise! haha You can do this two ways.. either use just the brush of the nail polish, or you can use an old paint detailing brush. Personally I used both, although I found that to just create the leaf part, its easier to use the brush and just clean up the lines with a detailing brush.
You create the leaf part of the strawberry by creating three triangles, making the middle one longer than the other two. To clean up the edges, I just put a drop of nail polish on a paper plate and used the detail brush I had laying around the house to clean up the lines. Also remember, these don't have to be perfect and they don't have to come to a point like mine did!
Be creative. You can make them rounded or pointed, doesn't matter! Make the design your own! =)
I used Sally Hansen Hard as Nails Xtreme Wear in Going Green for the leaf part. I found this color just complimented the pinky red color.
Now time for the little details. So I used Sally Hansen Hard as Nails Xtreme Wear in White On. Either with the tip of the brush of the nail polish or a detailing brush, add random spots to the pink part of the nails. I used a detailing brush for a little better control with the spots.
This is again just an added step that wasn't really needed, but I took Sinful Colors in Pinky Glitter and dotted it over the white color. I personally wanted this to be a very sparkly look.
Sorry the quality of the picture is bad... I promise the spots are more of a light pink now.. haha
To finish the sparkly effect, I added Sinful Colors in Green Ocean over the green leaf part. This glitter nail polish is fantastic. It has chunky foil like glitter in it and it makes for a really great way to finish the look!
I personally LOVE the bold colors and glitter but you don't have to have them as flashy! Take out the glitter nail polishes and you still have a great look!
So I hope you enjoyed this tutorial! This was definitely one of the harder nail designs I've done but once I got started, it does get easier I promise! I hope you all give this a try, this would be perfect for the summer months ahead!
Remember, Always keep Smiling!
XoXo,
LB
So this is my newest design! Read ahead for a step by step tutorial and the products I used!
Sorry the lighting was bad.. I have a better pic of my whole hand at the end! =)
So here we go!!
*Instead of taking pictures of each bottle, I took two pictures of the products I used and will list and say where I used them! =)
Left to Right
Sally Hansen Hard as Nails Hardener
Sinful Colors Professionals Base Coat
AVON Speed Dry Nail Enamel in Strawberry
Pure Ice in Watermelon Ice
Left to Right
Sally Hansen Hard as Nails Xtreme Wear in Going Green
Sally Hansen Hard as Nails Xtreme Wear in White On
Sinful Colors Professional in Green Ocean
Sinful Colors Professional in Pinky Glitter
Since I broke my pinky nail, I decided to start with Sally Hansen Hard as Nails Hardener to help keep my nails strong. It never hurts also with using bold colors to make sure you have a good base coat to keep your nails from having stains.
So on the safe side since I've dyed my nails before without a base haha, I added two coats of Sinful Colors Professional Base Coat... I am a fan of their nail polish so when I was shopping for the perfect green today for the leaf part of the strawberry nails, I picked up this base coat. I may do a review on it later on. =)
Now to start the strawberry nails! =) I love Avon products so when looking for the perfect shade for the strawberry, I found AVON Speed Dry Nail Enamel in Strawberry! I love tons of AVON nail polish so I was glad to get to use this one. It does dry quick which was also a plus!
Now if you know me, I LOVE sparkle so I decided to add an extra step and coat the entire nail with Pure Ice in Watermelon Ice. You don't have to add as much sparkle as I did of course, but I like the added effect.
Now to add the leaf part of the strawberry. Okay, this may seem hard but once you get started, it gets easier, I promise! haha You can do this two ways.. either use just the brush of the nail polish, or you can use an old paint detailing brush. Personally I used both, although I found that to just create the leaf part, its easier to use the brush and just clean up the lines with a detailing brush.
You create the leaf part of the strawberry by creating three triangles, making the middle one longer than the other two. To clean up the edges, I just put a drop of nail polish on a paper plate and used the detail brush I had laying around the house to clean up the lines. Also remember, these don't have to be perfect and they don't have to come to a point like mine did!
Be creative. You can make them rounded or pointed, doesn't matter! Make the design your own! =)
I used Sally Hansen Hard as Nails Xtreme Wear in Going Green for the leaf part. I found this color just complimented the pinky red color.
Now time for the little details. So I used Sally Hansen Hard as Nails Xtreme Wear in White On. Either with the tip of the brush of the nail polish or a detailing brush, add random spots to the pink part of the nails. I used a detailing brush for a little better control with the spots.
This is again just an added step that wasn't really needed, but I took Sinful Colors in Pinky Glitter and dotted it over the white color. I personally wanted this to be a very sparkly look.
Sorry the quality of the picture is bad... I promise the spots are more of a light pink now.. haha
To finish the sparkly effect, I added Sinful Colors in Green Ocean over the green leaf part. This glitter nail polish is fantastic. It has chunky foil like glitter in it and it makes for a really great way to finish the look!
I personally LOVE the bold colors and glitter but you don't have to have them as flashy! Take out the glitter nail polishes and you still have a great look!
So I hope you enjoyed this tutorial! This was definitely one of the harder nail designs I've done but once I got started, it does get easier I promise! I hope you all give this a try, this would be perfect for the summer months ahead!
Remember, Always keep Smiling!
XoXo,
LB
Wednesday, March 2, 2011
&*(Nail Tutorial -- Cheatin' Cheetah)*&
Hello everyone! I'm back with another nail tutorial. I hope you all enjoy this really easy tutorial! Be creative, you can always change the colors or do something different than what I did! =) That's the beauty of nail art designs or makeup, its a way to express yourself!
Base coats, depending on the one you use, can alway strengthen and condition your nails. I sometimes use a hardener nail polish in this stage too. As you can see, I broke my pinky nail off so I'm being extra careful as I grow it back out! If you are really into doing nails, I ALWAYS recommend using strengtheners so you can keep your nails growing long and beautiful! =)
Next, I painted my nails with this color by Pure Ice.. Jaguar. This is a really unique color. It's a pale gold with gold glitter in it. It's really pretty.. Sadly, when taking pictures of gold toned nail polishes, my camera freaked out and didn't take the best pictures.. =( *sorry!!*
Always add thin coats of nail polish and let them dry. This will dry MUCH faster than globs of nail polish. It's a pain but patience will take you places with doing nails! haha This was just one coat. I did two to get the color I wanted.
Next, I used this very sparkly gold glitter nail polish by Sinful Colors.. called this is it. I decided to add some extra detail and did a french tip with this nail polish to all of my nails. It gave the nails just a little depth and a little more "pop" in my opinion. French tip is always optional!
For this design, I chose to just have the spots going up the side of the nails other than the middle finger which has spots everywhere. You could use a dotting tool for this, a q-tip, or as I did.. just the nail polish brush. I didn't want all the spots to be perfect... No cheetah's spots are all the same! =)
Now to add the black around the spots! I used Kiss Nail Art Paint in Black. This is one of those nail polishes with a thin brush.. If you don't have a thin brush, you could always use a toothpick or a thin paint brush to do the details.
Let's get Started!!!
I ALWAYS start with a base coat. Currently I'm using Sally Hansen Double Duty Strengthening Base & Top Coat. Always protect your nails from any nail polish because you don't want to stain your actual nail.Base coats, depending on the one you use, can alway strengthen and condition your nails. I sometimes use a hardener nail polish in this stage too. As you can see, I broke my pinky nail off so I'm being extra careful as I grow it back out! If you are really into doing nails, I ALWAYS recommend using strengtheners so you can keep your nails growing long and beautiful! =)
Next, I painted my nails with this color by Pure Ice.. Jaguar. This is a really unique color. It's a pale gold with gold glitter in it. It's really pretty.. Sadly, when taking pictures of gold toned nail polishes, my camera freaked out and didn't take the best pictures.. =( *sorry!!*
Always add thin coats of nail polish and let them dry. This will dry MUCH faster than globs of nail polish. It's a pain but patience will take you places with doing nails! haha This was just one coat. I did two to get the color I wanted.
Next, I used this very sparkly gold glitter nail polish by Sinful Colors.. called this is it. I decided to add some extra detail and did a french tip with this nail polish to all of my nails. It gave the nails just a little depth and a little more "pop" in my opinion. French tip is always optional!
Here is a pic after I did the french tip.. you can see the Jaguar color better here. =) Its one of my favorite everyday colors. =) Remember, the trick to french tip... Roll your finger and leave the brush still, it'll give you a clean straight line everytime!
This was just an added step because I love everything to be sparkly!! haha I did a thin line under the french tip as well as all over the nail after I did the last step of the black C's around the spots to just add some sparkle.
Time for the spots! I chose this true copper color by Pure Ice, called Gold Dust. I decided to stay within the gold shimmery family so this is what I chose for the spots. You can choose whatever color scheme you like though! =)
For this design, I chose to just have the spots going up the side of the nails other than the middle finger which has spots everywhere. You could use a dotting tool for this, a q-tip, or as I did.. just the nail polish brush. I didn't want all the spots to be perfect... No cheetah's spots are all the same! =)
Create small C shapes around all the spots you made. Make them messy and all different just like cheetah spots! =) Add a top coat, and you are finished!!
I hope you enjoyed this tutorial. It's super easy and is meant too be messy so be creative. This took me 30 minutes from start to finish!! Hope you all try them and enjoy being fierce! =)
Remember, Always Keep Smiling!
XoXo,
LB
&*(ELF Cosmetics Haul/Review -- Misc. Products)*&
Hello again! =) Hope everyone has been enjoying their week. As promised in my last post, I have another random review of some more ELF products. This will be on eye products and a few concealer type products. Hope you all enjoy! Remember to stay tuned for more nail tutorials!! =)
Also, please give me some ideas of nail designs you'd like to see! I want to take some requests from people who actually view my blog! I am currently working on tutorials for: strawberry nails, cupcake nails, rainy day nails, penguin (by request) nails, stars (by request) nails, hello kitty nails, and some striped nails. Give me some ideas of what you'd like to see!!
NOTE: I BOUGHT THESE PRODUCTS WITH MY OWN MONEY. I DO NOT WORK FOR ELF OR AM I BEING PAID TO DO THIS REVIEW. THESE ARE MY HONEST OPINIONS && I HOPE YOU ENJOY!!!
Anyways, let's get to the review!!
ELF Cream Eyeliner -- $3.00
1.) (top) Gunmetal
2.) (bottom) Purple
*My Opinion -- Okay, I love cream eyeliners for my lower lash line but these are terrible. I really wanted to love these because I love the colors but they are very chalky and hard to smooth out the clumps. The top swatch is just to show the color, next is too show it blended out (which does really well if blended out with a finger, but not practical for a liner), and last is a line done with the brushes that come with this. I HATE these brushes... Upside to this product is it could probably be used as a cream eyeshadow, a base for dark colors possibly? Not sure.. Hoping I don't have to just throw these away. Note these are also NOT smudge proof!!*
*All $3.00*
1.) (same as above) Cream eyeliner in Ivory
2.) Elf Pigment Eyeshadow in Passionate Purple
3.) Elf Pigment Eyeshadow in Naughty Noire
4.) Cream Eyeshadow in Dawn
*My Opinion -- My review on the cream eyeliners is above.. As for the pigment eyeshadows, OMG I love these! haha The left side of the swatches are dry, the right is wet. These are AMAZING wet so I'll use them as eyeliners even. I think they are worth $3.00 and you get quite a bit of product so gotta love that too!!
As for the cream eyeshadow, I love these as well! (see better review on this product in my misc. eye products review) They are super creamy and blend really well. I ended up ordering this one for when I do neutral looks.*
ELF Mineral Eyeshadow -- $3.00
1.) Outdoorsy
2.) Dreamy
3.) Beachy
*My Opinion -- These are probably my favorite buy from ELF. The left side is dry, the right is the eyeshadow wet. I have been using Outdoorsy a lot as an eyeliner as you can tell from the spot on the lid haha NOTE: Beachy is actually darker than on here, the flash brightened it no matter what flash I used! Sorry about that.. anyways, they are really great! I have been using them with the eye primer from ELF and they stay on all day! Gotta love that. Plus they have added new colors as well, lots to choose from! Definitely try these out!*
*All $.100*
1.) Waterproof Eyeliner Pen in Black
2.) Liquid Eyeliner in Silver
3.) Liquid Eyeliner in Plum
4.) Liquid Eyeliner in Black
*My Opinion -- *sorry that the lines were not straight haha Couldn't draw a straight line to save my life that day!!!* The eyeliner pen is okay.. Not my favorite but worth a dollar I guess... Not really impressed but a cheap alternative if you don't want to buy an expensive one in the store or something.. The liquid eyeliners... The silver is especially awful!! The tip was really hard and I couldn't imagine putting that on a sensitive area like my eye!!!! The other two were also not the greatest but at least better than the silver's tip. I am kinda indifferent about this product. Not the worst, not the best.*
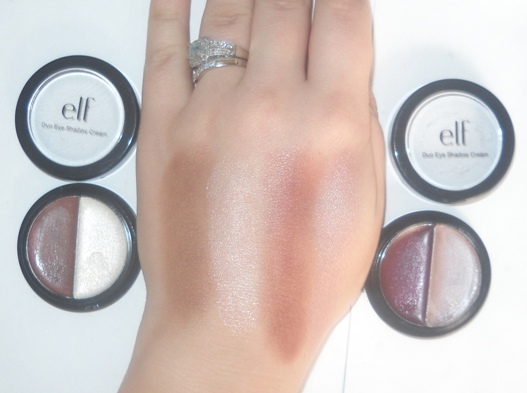
ELF Duo Eye Shadow Cream -- $.100
1.) Coffee & Cream
2.) Berry Mix
*My Opinion -- These are seriously shimmery, especially the lighter colors. These were blasted all over YouTube as a great base for eye shadow.. I agree, IF you want a shimmery look at least with these two colors. I can't say its the same for all of them but I actually didn't like the shimmer. I might use this for a night out with eyeshadow on top but not alone. Worth the money as a cheap base alternative though to help especially hold loose eyeshadow in place*
1.) Eye Primer & Liner Sealer -- $3.00
2.)Under Eye Concealer & Highlighter (glow/fair) -- $3.00
3.) ELF Mineral Blemish Powder in Sheer -- $8.00
4.) Eyelid Primer -- $1.00
5.) ELF Concealer Pencil & Brush in Fair -- $3.00
*My Opinion -- Starting with the first one, the eye primer is okay but I like the formula of #4. The first product creases and I personally don't use the liner sealer.. The second product is actually really nice. I like the highlighter.. The left side is the highlighter and the right is the concealer.. The concealer works well for under eye area and this product has a really creamy easy to blend formula. The third product.. I added a lot of product just so you could see there was a swatch there.. This is a bit shimmery which I don't like but I haven't tested this fully to see how it works for blemishes. I will try this product everyday for a month and see how I feel about it then.. The fourth product is an everyday product now! This works well with the loose eyeshadows and doesn't crease. Great cheap alternative to something like Urban Decay's Primer Potion. I also have the mineral eyeshadow primer from ELF *not pictured* but I like it just the same. The last product I hate so much. It is not fair at all and has an orange tint too it. The brush is great but not worth buying this product for that brush.
ELF Nail Polish Remover Pads -- $1.00 for 18 pads
*My Opinion -- I LOVE THESE! My husband always complains about me using strong smelling nail polish remover but these don't have that strong smell. They have a pleasant lemon smell too them and really do a great job removing nail polish. If you don't like the smell of nail polish remover, try these. They may not be very cost effective in my opinion since I do nail tutorials BUT I like them anyways. I bought three more of these after I tried it when I first ordered these. I just really like the smell of them and hey, it makes my husband happy! WIN WIN =P *
Well thank you everyone for checking out my beauty blog and I hope you like my reviews on these products. I will be doing a review on products from Avon soon as well as more reviews of ELF products. I have brushes, brush cleaner, and another palette from ELF to review!! Will be up soon!
If you are reading my review and don't have me as a friend on facebook, add me! BeautysMagic@yahoo.com Let me know you saw my Beauty Blog!!!! =)
Remember, always keep smiling!!
XoXo,
LB
Also, please give me some ideas of nail designs you'd like to see! I want to take some requests from people who actually view my blog! I am currently working on tutorials for: strawberry nails, cupcake nails, rainy day nails, penguin (by request) nails, stars (by request) nails, hello kitty nails, and some striped nails. Give me some ideas of what you'd like to see!!
NOTE: I BOUGHT THESE PRODUCTS WITH MY OWN MONEY. I DO NOT WORK FOR ELF OR AM I BEING PAID TO DO THIS REVIEW. THESE ARE MY HONEST OPINIONS && I HOPE YOU ENJOY!!!
Anyways, let's get to the review!!
ELF Cream Eyeliner -- $3.00
1.) (top) Gunmetal
2.) (bottom) Purple
*My Opinion -- Okay, I love cream eyeliners for my lower lash line but these are terrible. I really wanted to love these because I love the colors but they are very chalky and hard to smooth out the clumps. The top swatch is just to show the color, next is too show it blended out (which does really well if blended out with a finger, but not practical for a liner), and last is a line done with the brushes that come with this. I HATE these brushes... Upside to this product is it could probably be used as a cream eyeshadow, a base for dark colors possibly? Not sure.. Hoping I don't have to just throw these away. Note these are also NOT smudge proof!!*
*All $3.00*
1.) (same as above) Cream eyeliner in Ivory
2.) Elf Pigment Eyeshadow in Passionate Purple
3.) Elf Pigment Eyeshadow in Naughty Noire
4.) Cream Eyeshadow in Dawn
*My Opinion -- My review on the cream eyeliners is above.. As for the pigment eyeshadows, OMG I love these! haha The left side of the swatches are dry, the right is wet. These are AMAZING wet so I'll use them as eyeliners even. I think they are worth $3.00 and you get quite a bit of product so gotta love that too!!
As for the cream eyeshadow, I love these as well! (see better review on this product in my misc. eye products review) They are super creamy and blend really well. I ended up ordering this one for when I do neutral looks.*
ELF Mineral Eyeshadow -- $3.00
1.) Outdoorsy
2.) Dreamy
3.) Beachy
*My Opinion -- These are probably my favorite buy from ELF. The left side is dry, the right is the eyeshadow wet. I have been using Outdoorsy a lot as an eyeliner as you can tell from the spot on the lid haha NOTE: Beachy is actually darker than on here, the flash brightened it no matter what flash I used! Sorry about that.. anyways, they are really great! I have been using them with the eye primer from ELF and they stay on all day! Gotta love that. Plus they have added new colors as well, lots to choose from! Definitely try these out!*
*All $.100*
1.) Waterproof Eyeliner Pen in Black
2.) Liquid Eyeliner in Silver
3.) Liquid Eyeliner in Plum
4.) Liquid Eyeliner in Black
*My Opinion -- *sorry that the lines were not straight haha Couldn't draw a straight line to save my life that day!!!* The eyeliner pen is okay.. Not my favorite but worth a dollar I guess... Not really impressed but a cheap alternative if you don't want to buy an expensive one in the store or something.. The liquid eyeliners... The silver is especially awful!! The tip was really hard and I couldn't imagine putting that on a sensitive area like my eye!!!! The other two were also not the greatest but at least better than the silver's tip. I am kinda indifferent about this product. Not the worst, not the best.*
ELF Duo Eye Shadow Cream -- $.100
1.) Coffee & Cream
2.) Berry Mix
*My Opinion -- These are seriously shimmery, especially the lighter colors. These were blasted all over YouTube as a great base for eye shadow.. I agree, IF you want a shimmery look at least with these two colors. I can't say its the same for all of them but I actually didn't like the shimmer. I might use this for a night out with eyeshadow on top but not alone. Worth the money as a cheap base alternative though to help especially hold loose eyeshadow in place*
1.) Eye Primer & Liner Sealer -- $3.00
2.)Under Eye Concealer & Highlighter (glow/fair) -- $3.00
3.) ELF Mineral Blemish Powder in Sheer -- $8.00
4.) Eyelid Primer -- $1.00
5.) ELF Concealer Pencil & Brush in Fair -- $3.00
*My Opinion -- Starting with the first one, the eye primer is okay but I like the formula of #4. The first product creases and I personally don't use the liner sealer.. The second product is actually really nice. I like the highlighter.. The left side is the highlighter and the right is the concealer.. The concealer works well for under eye area and this product has a really creamy easy to blend formula. The third product.. I added a lot of product just so you could see there was a swatch there.. This is a bit shimmery which I don't like but I haven't tested this fully to see how it works for blemishes. I will try this product everyday for a month and see how I feel about it then.. The fourth product is an everyday product now! This works well with the loose eyeshadows and doesn't crease. Great cheap alternative to something like Urban Decay's Primer Potion. I also have the mineral eyeshadow primer from ELF *not pictured* but I like it just the same. The last product I hate so much. It is not fair at all and has an orange tint too it. The brush is great but not worth buying this product for that brush.
ELF Nail Polish Remover Pads -- $1.00 for 18 pads
*My Opinion -- I LOVE THESE! My husband always complains about me using strong smelling nail polish remover but these don't have that strong smell. They have a pleasant lemon smell too them and really do a great job removing nail polish. If you don't like the smell of nail polish remover, try these. They may not be very cost effective in my opinion since I do nail tutorials BUT I like them anyways. I bought three more of these after I tried it when I first ordered these. I just really like the smell of them and hey, it makes my husband happy! WIN WIN =P *
Well thank you everyone for checking out my beauty blog and I hope you like my reviews on these products. I will be doing a review on products from Avon soon as well as more reviews of ELF products. I have brushes, brush cleaner, and another palette from ELF to review!! Will be up soon!
If you are reading my review and don't have me as a friend on facebook, add me! BeautysMagic@yahoo.com Let me know you saw my Beauty Blog!!!! =)
Remember, always keep smiling!!
XoXo,
LB
&*(ELF Cosmetics Haul/Review -- Misc. Lip Products)*&
Hello everyone!! I apologize in advance for this being late. I have been crazy busy since my husband and I will be moving in a few months and starting to make plans for that! I promise I am still doing my beauty blog! :)
I have tried recording some videos for my YouTube channel but I'm having to figure out this camera.. It's not focusing for some reason so if anything, until I get it working right and such, I will post tutorials on here with pictures. =) Next nail tutorial will be posted after I finish this. =) Cheetah nails, I'm going to be doing cupcake nails and strawberry nail tutorials soon! =)
Question of the Day:
Either answer on here, or my facebook page... What kind of nail designs would you like to see? Always looking for more ideas!
NOTE: I BOUGHT THESE PRODUCTS WITH MY OWN MONEY. I DO NOT WORK FOR ELF OR AM I BEING PAID TO DO THIS REVIEW. THESE ARE MY HONEST OPINIONS && I HOPE YOU ENJOY!!!
Therapeutic Conditioning Lip Balm - $1.00:
1.) Vanilla Creme (smells like vanilla)
2.) Orange Creme (smells exactly like orange cleaner)
3.) Blackberry Creme (has a sweet berry smell)
4.) Strawberry Creme (has a faint fake strawberry smell)
*My Opinion -- These are each a dollar and for the price, I guess they are not bad although each is a little different in the quality. I'm not sure if its the ingredients in the vanilla one but its really moisturizing and would be my reccomendation out of all of these.. I personally do not like the texture of the other three. The vanilla one is really creamy and goes on really smooth and actually feels like its conditioning my lips.. the others, not so much. They are more chalky too me. I really don't like the smell of the orange creme balm.. it's really strong smelling and it smells like something you'd use to clean your kitchen.. Not my favorite ELF product*
ELF Mineral Lipstick - $5.00
1.) Natural Nymph
2.) Runway Pink
3.) Barely Bitten
*My Opinion -- Honestly, these are not worth the money. I even got these on sale for 2.50 each and I still don't think they are worth that.. They are chalky, you'd have to use gloss with it and even then I don't like the way it looks. I prefer creamy lipsticks so they stay smooth as you wear them but the formula in these, I just really am disappointed in. If you did try these, NOTE: The colors on the website are not accurate. Each of the ones I got, the colors are actually a lot darker than the site shows. So personally I do not like these. Not worth $5.00!*
1.) Ruby Slipper
2.) Baby Lips
3.) Brownie Points
4.) Cherry Tart
5.) Raspberry
*My Opinion -- I actually really like these. It doesn't take much product to get a good color pay off. They all smell like peppermint. These are a little sticky and I'm really picky about that but I really like these even though they are not very creamy feeling. I like the wearability of these and that they come in a lot of colors!! Definitely try these.. Don't be afraid to go dark with these also! They are not as intense as they are in the tube.. Also, I actually really like the applicator on these. It makes for really easy application.*
I ended up ordering two more colors of the liquid lipstick. SEE REVIEW ABOVE.
1.) Caramel Candy
2.) Strawberry
ELF Mineral Lipgloss -- $3.00
1.) Trophy Wife
2.) Au Naturale
*My Opinion -- These are actually really decent glosses. Very creamy and pigmented. I wish the doe tip applicator would come out of the bottle with more product on it but that's really not a huge complaint. Lots of colors. NOTE: Trophy wife is pretty much a clear gloss even though it looks gold in the tube. It goes on clear.*
ELF Conditioning Lip Balm SPF 15 -- $3.00
1.) Romantic Rouge
2.) Peaceful Pink
3.) Blissful Berry
4.) Mellow Melon
*My Opinion -- I actually LOVE these. They get a lot of bad reviews on ELF's website but I really love how pigmented these are and how they are really creamy. I definitely recommend these!! These have way more pigmentation than the liquid lipsticks so I prefer these over those but both are great products for the price. I will definitely be getting more colors of these. Only complaint: The opening to actually get the product out is small and with nails, its extremely difficult. I just bought the set of 10 lip wands though to get the product out so not really a big issue!*
2 in 1 Conditioning Gloss -- $3.00
1.) Golden
2.) Perfect Pink
3.) Supermodel
*My Opinion -- Absolutely NOT worth the money!!!!!! As you can see the first two, the color doesn't even show up that comes out of the center of the lipglosses. Cheaply made, glossy is very tacky. I will NOT buy any more and will throw these away, that's how much I don't like them*
ELF Super Glossy Lip Shine -- $1.00
1.) Malt Shake
2.) Pink Kiss
3.) Honey Do
4.) Candlelight
*My Opinion -- These smell really good so I really was hoping I'd like these. They have a really great grape vanilla scent BUT are awful glosses!! SUPER TACKY, I mean its literally hard to rub your lips together, its that tacky. The color payoff isn't very good either... Plus the colors on a couple of these are way off from the site.. Not worth a dollar! These will be thrown away too*
ELF Minty Lip Gloss -- $3.00
1.) Los Angeles
2.) Nashville
3.) San Diego
4.) Chicago
5.) Miami
6.) Houston
*My Opinion -- Saved my FAVORITE for last!! These are worth even $3.00 a lipgloss! I love everything about these. The color may not be as pigmented as I'd like but they are buildable colors, have mint in them so they give a strong cooling effect, taste amazing!! haha I'll be buying the last three so I have all the colors! Because they are not as pigmented, don't be afraid to try darker colors. These are definitely worth the money!!!*
Only complaint is that the lid is cheaply put together... Easy fix with super glue though. I love the gloss so much that I'm okay with the lid being really cheap. haha The two seperated as soon as I opened it.. Fixed it and am happy with the product.
I hope you all enjoyed my lip product review. I will be posting a misc. product review soon since I have a few things that I didn't post in my first post of eye products and such since the orders hadn't come in yet! Hope you all are having a great day!
Remember, always stay smiling!!
XoXo,
LB
Subscribe to:
Posts (Atom)