Hello lovelys! I feel terrible that yet again I'm late on getting my post up! But I promise I do have the two tutorial pictures ready and am posting today! Also, doing a what's coming up post as well! =)
So if you'd like to see how I did these super cute girly nails, read on! Thanks again for all of the support!
The products I used for these super cute nails:
1.) Sally Hansen Hard as Nails Hardener
2.) Sinful Colors Basecoat
3.) Sally Hansen Xtreme Wear in Lacey Lilac
4.) Pure Ice polish in Oh Baby!
5.) Glitters from the Edelle Deco Art Kit
6.) Little jar of decals are from Abella Glamour Nail Art Kit
Starting with natural nails, I decided to do a coat of Sally Hansen Hardener because I know I preach about how you shouldn't peel off nail polish but I did the other day and tore up the tops of my nails. haha I had to cut them down and am trying to let them grow back in. Anyways, this was just an extra step, it isn't needed.
As always, start with a base coat. I don't care how light the nail polish is, you should always protect your nails to keep them from staining and to add just a protective layer in between your polish and your nails.
I used Sinful Colors Basecoat because it leaves a light milky colored coat which can help enhance the color of your polish.
Next, I used Sally Hansen Xtreme Wear in Lacey Lilac. This is a perfect color for spring in my opinion and it makes like the ultimate girly nails. :)
I should have done this to my other hand but I didn't think about it haha... Just a tip, you can use one of these wooden sticks to wipe away the nail polish that gets on the skin. They are cheap and can save you from having to use a lot of nail polish remover. =)
Now for the decorating! =)
To do the glitter french tip, I used Pure Ice nail polish in Oh Baby! because it has the same iridescent glitter as the glitter I used for the nails.
I did the normal swipe of the polish across just the tip of the nail and then dipped the nail into glitter on a paper plate.
NOTE: Make sure the rest of your nail polish is dried or it will stick too it.
To add the decals, I put a drop of the Hardener on a paper plate and used the wooden stick to dip into the polish and to pick up the decals and place them on the nails! It's as easy as that.
Add a top coat, and you are finished!!
I hope you enjoyed this tutorial. Stay tuned for some black and gold medieval nails. =)
Remember: Always stay smiling!
XoXoXo,
LB
Hello everyone! My name is Sarah (also go by LB) and I've finally decided to start a beauty blog!! I've watched makeup guru's on YouTube for 2 years now and finally decided I wanted to be one too! In this blog I'll be doing better swatches of makeup, more detailed reviews when requested, nail tutorials, haul posts, and so much more!! I'm so excited to take this journey with you all and thank you all for viewing my blog and giving your feedback! =)
Monday, April 18, 2011
Saturday, April 16, 2011
&*(Late Update)*&
Hello loves, I want to apologize! I hate that I broke my promise about having something up soon. =(
My father in law was here for a much needed visit and we have my family coming in the next few weeks to help us move. We have lots going on with moving. Gotta love the military lifestyle! haha Anyways, Sunday I WILL have two new nail tutorials up. I just did my second nail design today (even though I did my nails two days ago) just so I could have another one to post for you all. I again apologize. I hate that I didn't keep too my promise but life has to come first and this move is across the USA!! Anyways, I will be trying to do more to post for you all before I do my move so you will all have something to read before I get set up in SC. I will be also trying to get my youtube channel up after I get to SC.
It's really hard to find good lighting in this house and by the time I get everything set up for the videos, we will have to pack it up! haha I promise I will be doing my channel though.
Until Sunday enjoy your weekend and I will talk too you all soon.
Remember, always stay smiling!
XoXoXo,
LB
My father in law was here for a much needed visit and we have my family coming in the next few weeks to help us move. We have lots going on with moving. Gotta love the military lifestyle! haha Anyways, Sunday I WILL have two new nail tutorials up. I just did my second nail design today (even though I did my nails two days ago) just so I could have another one to post for you all. I again apologize. I hate that I didn't keep too my promise but life has to come first and this move is across the USA!! Anyways, I will be trying to do more to post for you all before I do my move so you will all have something to read before I get set up in SC. I will be also trying to get my youtube channel up after I get to SC.
It's really hard to find good lighting in this house and by the time I get everything set up for the videos, we will have to pack it up! haha I promise I will be doing my channel though.
Until Sunday enjoy your weekend and I will talk too you all soon.
Remember, always stay smiling!
XoXoXo,
LB
Wednesday, April 6, 2011
*Little Update*
Hello lovelys! I apologize for lack of posting lately. My Father in Law is coming to visit today so I've been busy preparing for his visit. If that wasn't enough to keep me busy, my husband and I are moving in about a month and its a big move SOOOO that also has us on our toes! haha I promise I will be posting another nail tutorial (cherries ^_^) this week. After my Father in Law leaves on Sunday, I'll be back doing my reviews and such! =)
I know it may not be huge to everyone else but thank you for helping me reach 250 views! That is beyond exciting for me since I didn't think I would get that many people to see my blog! I hope to reach more and just share this wonderful passion of mine!
Until then, remember keep smiling!
Have a great week everyone!
=)
XoXoXo,
LB
I know it may not be huge to everyone else but thank you for helping me reach 250 views! That is beyond exciting for me since I didn't think I would get that many people to see my blog! I hope to reach more and just share this wonderful passion of mine!
Until then, remember keep smiling!
Have a great week everyone!
=)
XoXoXo,
LB
Tuesday, March 29, 2011
&*(BFTE Cosmetics Looks!)*&
Hello loves! So I know I'm a little late getting this up. I apologize. I've been busy getting ready for my father in law to come to visit and just had a lot of stuff going on. ANYWAYS!
So I finally got to play with my colors and I have to admit, I didn't think I could be any more impressed but yet I am! These colors blend so well and I love their staying power! Even my go to eye makeup remover *extra virgin olive oil* had a little trouble which hey! I'm okay with! I rather have my colors stay put so that means I don't have to do touch ups 5 times a day! haha
Anyways, I decided to also do a look with the new color of the week: Iced Violets. The color of the week is where you get a full size jar of eye shadow for the sample size price.. $2.00. I love Iced Violets because its such a soft purple which is not something I have in my collection. Definitely check it out!
http://www.bftecosmetics.com/
**Note: I haven't done my hair for the day yet... Its 4 AM. haha Decided it was just easier to put it in a pony tail and keep my bangs to the side haha*
First Look -- Neutral
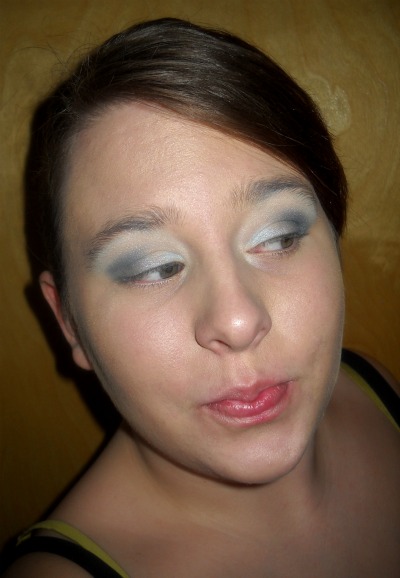
Third Look -- Smokey Blues
So I finally got to play with my colors and I have to admit, I didn't think I could be any more impressed but yet I am! These colors blend so well and I love their staying power! Even my go to eye makeup remover *extra virgin olive oil* had a little trouble which hey! I'm okay with! I rather have my colors stay put so that means I don't have to do touch ups 5 times a day! haha
Anyways, I decided to also do a look with the new color of the week: Iced Violets. The color of the week is where you get a full size jar of eye shadow for the sample size price.. $2.00. I love Iced Violets because its such a soft purple which is not something I have in my collection. Definitely check it out!
http://www.bftecosmetics.com/
**Note: I haven't done my hair for the day yet... Its 4 AM. haha Decided it was just easier to put it in a pony tail and keep my bangs to the side haha*
First Look -- Neutral
I truly believe everyone should learn to do a neutral look as one of their first looks. As many guru's and such have pointed out.. makeup shouldn't define you, just enhance your natural beauty! I personally usually do purple looks because of my eye color BUT neutrals will look good on ANYONE! =)
Remember be happy with who you are underneath your makeup too!!
First tip of this Blog! haha
All colors are exactly as said in picture BUT...
I took Truffle AND Oak and blended to the brow bone. I like truffle as a matte color BUT I wanted some sparkle too this which Oak is exactly that!! No matter how much I tried my flash took out the sparkle and since its 4 AM.. I kind of needed the flash! haha
My picture above this I liked but I wanted a little more flash too it so I added Autumn as a liner.. I just smudged it into the lower lash line.
Second Look -- Green on Green
Okay, Second Tip of this Blog: DEFINITELY have a larger fluffy brush to blend out harsh lines and blend colors together. My first attempts with these eyeshadows I couldn't find any of mine and it was harder to blend with a contour brush. I LOVE the fluffy blending brush from ELF. I used all ELF brushes for these looks. =)
I had never done a bright color like this but I decided to try and even though I have green/hazel eyes.. I really like this on me.
Third tip of this Blog: Don't be afraid of color. Think about it. Your eyes are not closed all the time *unless sleeping haha* so you won't see all the bright colors the whole time your eyes are open! Bold colors can enhance your eye color as well! =)
Just as the last look, everything is as is in the picture but I blended Green Apple and Caribbean together all the way to the brow bone.
I have to say out of these colors, I am loving $10 Pineapple! I'm going to buy a full size of this color as well as Butt Naked which are such great high light colors for me. Personally I just love the sparkle in $10 Pineapple. =)
Third Look -- Smokey Blues
Usually I stay away from blue unless its a blue smokey eye. A lot of people tend to fear blues because they can sometimes be really intense but...
Fourth Tip of this Blog: NOT ALL SHADES OF BLUE OR GREEN OR PURPLE etc are the same! Don't be afraid to try a color that you wouldn't normally wear. In this case, I mixed a bold blue called Bermuda with a charcoal sparkly gray called Alakazam to tone the color down to make it more wearable.
Fifth tip of this Blog: Ever have one of those days where you are running late and you have to do your makeup fast; try a neutral lid and a pop of bright color on the lower lash line! It will instantly brighten your face and you are out the door! =)
As I wrote earlier, your eye is not always open so the colors are not as intense when your eye is open. I decided to just show an example of this look. Personally I wish I would have done an eyeliner on the bottom lash line to just make this a little more intense of a smokey eye but that's just me.
Sixth tip of this Blog: As you can see usually always add a color to my crease. Doing this adds depth to your eyes and is key to doing a smokey eye. I personally don't take the color in my crease all the way to the inner corner of the eye because I feel it becomes too harsh and like to keep light colors on the inner corner to brighten the eye area.
Just as the others, I decided to blend two colors to the brow bone.. Alakazam and Bermuda.
For me, Bermuda is a little too bold of a blue for me all over the lid so I just toned it down with another color. I do that a lot when it comes to a lot of the palettes I have and such.
Seventh tip of this Blog: Use a lighter color than your skin tone on your inner corner of your eye. This instantly brightens the eye area! I used Butt Naked on the inner corner and under my eyebrow.
Fourth Look -- Mixing Colors
Mixing color combinations to make an eye look is one way to instantly grab people's attention. I personally LOVE using teal colors as a lower lash line color. It brings a pop of color to the look and compliments the other colors used.
I kept the lid very light and then put the bold teal on the bottom to bring attention to the eyes.
Eighth tip of the Blog: Okay, so I didn't do this with this look because its 4 AM and I was only wearing lip balm BUT remember the best rule with makeup... If you do a bright eye or bold eye makeup, make sure you do your lips in a nude/neutral color.
If you do a light eye, then do a bold lip! You don't want your makeup to be too in your face *no pun intended haha* and as I pointed out before, just enhance the beauty you already have!!! =)
As you can see in this look, I chose to do a light pink, purple (the color of the week, this week!!!), and the pop of teal.
This is actually what I'll be wearing today!
Remember, be creative! Try things you wouldn't before! You'll be amazed. I never thought I'd like yellow on me or pinks and I actually do!
Have fun with your makeup! =)
Remember to check out http://www.bftecosmetics.com/ every week to see if a color you want has been chosen as the color of the week. Join their fan page on facebook (just seach Beauty From the Earth) and you can help choose the color of the week and keep up to date on sales and contests!
Thanks for reading and hope you liked all the looks and tips! I'll definitely do more soon!!
XoXoXo,
LB
<3
Saturday, March 26, 2011
&*(BFTE Swatches!!!)*&
Hello loves! I'm back again!! <3 So I actually finished my swatches earlier since I decided I would hold myself back from playing yet and just get the swatches up so everyone can see these beautiful colors! As most of you know, I'm very picky about makeup and the companies that I get behind but I love everything about this company!
Every single color blended easily and were very pigmented. I'm the type of person that the makeup I use has to be pigmented! I don't want to spend hours just building colors. These are beautiful colors that you can make lighter but build quickly. I seriously am addicted to this company! If you have facebook, definitely look them up! All the people on the site are so nice as well! Definitely a fan page I check everyday! Just search Beauty From The Earth!
You can order from them at: http://www.bftecosmetics.com/
Sample sizes are $2.00
Full sizes are $6.50
They sell a variety of products so definitely check them out! Okay okay, I'm done gushing about this company! Now to the good stuff! Duh, the makeup!!
=)
NOTE: In the swatches, I have them in sets of four colors. First swatch is dry, then wet, finally with ELF mineral eye primer!
I ordered three 16 pc sample tins and the color of the week. =)
I'm personally a purpleholic so I had one tin of just purples! haha
Personally in this tin, my favorite 5 would have to be:
1.) Sugar Plum
2.) Rock You
3.) Orchid
4.) Grape
5.) Midnight Kisses
Top Row
1.) Twister
2.) Iced Violets
Bottom Row
1.)Belle of the Ball
2.) Purple Iris
Top Row
1.) Runaway
2.) Sugar Plum
Bottom Row
1.) Grape
2.) Big Ego
Top Row
1.) Midnight Kisses
2.) Unicorn
Bottom Row
1.) Class Act (loose glitter.. didn't stay without a good primer)
2.) Rock You
Top Row
1.) Orchid
2.) Embrace (looks lavender in container, but actually comes off as a reddish purple.. very unique)
Bottom Row
1.) Aphrodite
2.) Panurple
My second tin was like my rainbow tin! haha I love teals and greens as eyeliner colors for me so I have several of those colors. I don't usually wear brighter colors but everyone's pictures online looked amazing so I thought I'd try them!!
Favorite 5 from this tin would be:
1.) Illusion
2.) Envy
3.) Aloha
4.) Miracle
5.) $10 Pineapple
Top Row
1.) Breeze
2.) Bermuda
Bottom Row
2.) Fairytale
Top Row
2.) Voodoo
Bottom Row
1.) Illusion
2.) Caribbean
Top Row1.) Green Apple
2.) Lemon
Bottom Row
1.) $10 Pineapple
2.) Envy
1.) Aloha
2.) Princess
Bottom Row
1.) Passion
2.) Raspberry
Far Left is my full size jar that I got of the color of the week.. Sweet N Spicy
The last tin I ordered, I decided to make it into my neutrals, highlights, and colors for a deep smokey eye.
Favorite 5 out of this tin would be:
1.) Butt Naked
2.) Alakazam
3.) Steel
4.) Beautiful
5.) Celtic Charms
Top Row
1.) Butt Naked
2.) Beautiful
Bottom Row
1.) Eggplant Light
2.) Lynx (this is a sample of their highlighter face product)
Top Row
1.) Oak
2.) Truffle
Bottom Row
1.) Satin Sheets
2.) Coal
Top Row
1.) Alakazam (sorry this image is a bit blurry)
2.) Mississippi Mud
Bottom Row
1.) Celtic Charms
2.) Autumn
Top Row
1.) Smoke
2.) Black
Bottom Row
1.) Dirty Deals
2.) Steel
Hope you all enjoy all the swatches! Sorry a few look a bit messy or were a bit blurry! If you want better swatches of any color, let me know! I aim to please! =)
I'll be doing some looks with their makeup tomorrow so stay tuned!
Until next time, remember to always stay smiling!
XoXoXo,
LB
Friday, March 25, 2011
&*(Too Excited about BFTE Cosmetics! Had to Share!!)*&
Hello lovelys! Okay so I know I do not have any swatches ready yet and heck, I just opened my shipment but I'm super excited to share with you all a company I found on FaceBook actually!!
BFTE *Beauty From The Earth* Cosmetics!
I just ordered three 16 pc sample tins and look how beautiful the colors are!! I mean seriously!! haha I have ordered from ALOT of companies but I have never enjoyed with with a company as much as BFTE. Their customer service is great and their facebook page (Search for Beauty From the Earth to find their fan page) was just something else. Everyone on the fan page has been great and are all super nice and help each other find the right colors! It's amazing to find such a well ran fan page! I read the page for about 2 months before I decided to order and as you all know, when I order I go big! haha Loving all the colors and am about to jump off here to go do some looks for some pictures on here as well! haha I've gotten excited before with other companies but not like this!
As everyone says on the fan page, thanks for feeding my makeup addiction with such great products! I will be telling ALL of my friends about this company! Seriously check it out! Swatches of all colors tomorrow! I better get busy!
Till then, remember always stay smiling!
XoXoXo,
LB
BFTE *Beauty From The Earth* Cosmetics!
I just ordered three 16 pc sample tins and look how beautiful the colors are!! I mean seriously!! haha I have ordered from ALOT of companies but I have never enjoyed with with a company as much as BFTE. Their customer service is great and their facebook page (Search for Beauty From the Earth to find their fan page) was just something else. Everyone on the fan page has been great and are all super nice and help each other find the right colors! It's amazing to find such a well ran fan page! I read the page for about 2 months before I decided to order and as you all know, when I order I go big! haha Loving all the colors and am about to jump off here to go do some looks for some pictures on here as well! haha I've gotten excited before with other companies but not like this!
As everyone says on the fan page, thanks for feeding my makeup addiction with such great products! I will be telling ALL of my friends about this company! Seriously check it out! Swatches of all colors tomorrow! I better get busy!
Till then, remember always stay smiling!
XoXoXo,
LB
Tuesday, March 22, 2011
&*(Quick Nail Polish Removal Trick)*&
I'm back again with a quick tip for removing tough nail polish. =)
Have you ever done your nails and it was a dark color, lots of layers of colors, or have glitter and its difficult to remove? Well here is my way of removing nail polish EVERY time!! =)
I always tend to have a lot of nail polish in my designs and such so this is my go-to too remove nail polish.
You need the following items:
1.) Nail Polish Remover of your choice
2.) Q-Tips
3.) Aluminum Foil.. Yes.. Aluminum foil haha
4.) A Paper Towel
This takes about 10 minutes so keep reading if you want to learn another way to remove your nail polish in one swipe!
Start with ripping a small piece of paper towel and soaking it in nail polish remover.
I personally fold my paper towel in half and then rip a piece off so its two sided to hold more remover.
Now form the piece of paper towel to your nail. Rub the paper towel into your nail. As you can see, I was removing my cupcake nails and was removing the polish from my yellow painted nail.
Yup, you guessed it! Now take a strip of foil and cover the paper towel covered nail.
This will keep the soaked paper towel in place.
Now finish all of your nails with these steps!
It's that easy! Now wait 5-10 minutes!
I personally hate how cold your fingers get when you keep them in the nail polish remover and I hate having to scrub at my nails to remove the polish.
When you remove these, most of the polish will come off in one swipe. Literally I was able to see the cupcake design in the paper towel when I pulled these off! haha My cupcake design had ALOT of flaky glitter which is hard to remove and usually hard on the tops of your nails. This works perfectly!
Sometimes I'd dip my nails back down into my nail polish remover to soak the paper towel again and just to help remove the polish.
To remove the foil and paper towel.. Rub across the foil again just to help loosen up the polish and paper towel. I usually rub across like 5-15 times to just help loosen them up. Then to remove, press firmly on the middle of the nail and slide the foil/paper towel off. Make sure to keep some pressure on the nail to remove.
As you can see with my pointer finger, it pulls most of the polish off. If not, you can always slide your nail back into the foil and rub the rest of the polish off. I like to make the paper towel strips big enough to go around my nail so I have an extra side to wipe the last of the polish off. Use the q-tips to clean up any edges or last polish.
There you go! All finished. Wash your hands and you have clean nails to start your next nail creation!!
I hope you liked this little trick! I know I use it all the time especially if I used glitter or a lot of polish!!
I will have more reviews coming up and check out the star tutorial I just did as well!
Remember Always Keep Smiling!!!!!
XoXoXo,
LB
Have you ever done your nails and it was a dark color, lots of layers of colors, or have glitter and its difficult to remove? Well here is my way of removing nail polish EVERY time!! =)
I always tend to have a lot of nail polish in my designs and such so this is my go-to too remove nail polish.
You need the following items:
1.) Nail Polish Remover of your choice
2.) Q-Tips
3.) Aluminum Foil.. Yes.. Aluminum foil haha
4.) A Paper Towel
This takes about 10 minutes so keep reading if you want to learn another way to remove your nail polish in one swipe!
Start with ripping a small piece of paper towel and soaking it in nail polish remover.
I personally fold my paper towel in half and then rip a piece off so its two sided to hold more remover.
Now form the piece of paper towel to your nail. Rub the paper towel into your nail. As you can see, I was removing my cupcake nails and was removing the polish from my yellow painted nail.
Yup, you guessed it! Now take a strip of foil and cover the paper towel covered nail.
This will keep the soaked paper towel in place.
Now finish all of your nails with these steps!
It's that easy! Now wait 5-10 minutes!
I personally hate how cold your fingers get when you keep them in the nail polish remover and I hate having to scrub at my nails to remove the polish.
When you remove these, most of the polish will come off in one swipe. Literally I was able to see the cupcake design in the paper towel when I pulled these off! haha My cupcake design had ALOT of flaky glitter which is hard to remove and usually hard on the tops of your nails. This works perfectly!
Sometimes I'd dip my nails back down into my nail polish remover to soak the paper towel again and just to help remove the polish.
To remove the foil and paper towel.. Rub across the foil again just to help loosen up the polish and paper towel. I usually rub across like 5-15 times to just help loosen them up. Then to remove, press firmly on the middle of the nail and slide the foil/paper towel off. Make sure to keep some pressure on the nail to remove.
As you can see with my pointer finger, it pulls most of the polish off. If not, you can always slide your nail back into the foil and rub the rest of the polish off. I like to make the paper towel strips big enough to go around my nail so I have an extra side to wipe the last of the polish off. Use the q-tips to clean up any edges or last polish.
There you go! All finished. Wash your hands and you have clean nails to start your next nail creation!!
I hope you liked this little trick! I know I use it all the time especially if I used glitter or a lot of polish!!
I will have more reviews coming up and check out the star tutorial I just did as well!
Remember Always Keep Smiling!!!!!
XoXoXo,
LB
Subscribe to:
Posts (Atom)